Think of Azure Virtual Desktop, or AVD for short, as your own personal workspace in the cloud. It’s like having your Windows 11 or Windows 10 desktop, but you can access it from anywhere. You can even choose to use just specific apps with something called RemoteApp. The cool part? You don’t need any gateway servers. It’s flexible enough to handle all sorts of workloads, and you can use your own image or pick one from the Azure Gallery. Just keep in mind, it’s more for businesses rather than individual users. With AVD, you’re setting up an environment that can grow and change with your needs.
If you’re curious and want to dive deeper into how all this works, I highly recommend checking out the Azure Virtual Desktop architecture page on the Microsoft Architecture Center. It’s a treasure trove of information! Here you can find the Azure Virtual Desktop for enterprise page including a Visio diagram that you can download and edit.
Table of Contents
- AVD Lab Setup
- High level diagram of the Lab Setup
- LAB Guided Steps
- Domain Controller
- User Profile Disks
- Create the DirSync server
- Join the Storage Account to the Active Directory Domain Services
- Create the File Share for the User Profile Disks
- Configure the FSLogix through Group Policy
- Create the Image
- Create the Host Pool
- Assign user to the host pool application group
- User access
- Update Image
- Auto scale & Start VM on connect
- Scaling plan
- Session Limits & Stop the VMs automation
- Authentication & Security
- User experience & Security
- Monitoring
AVD Lab Setup
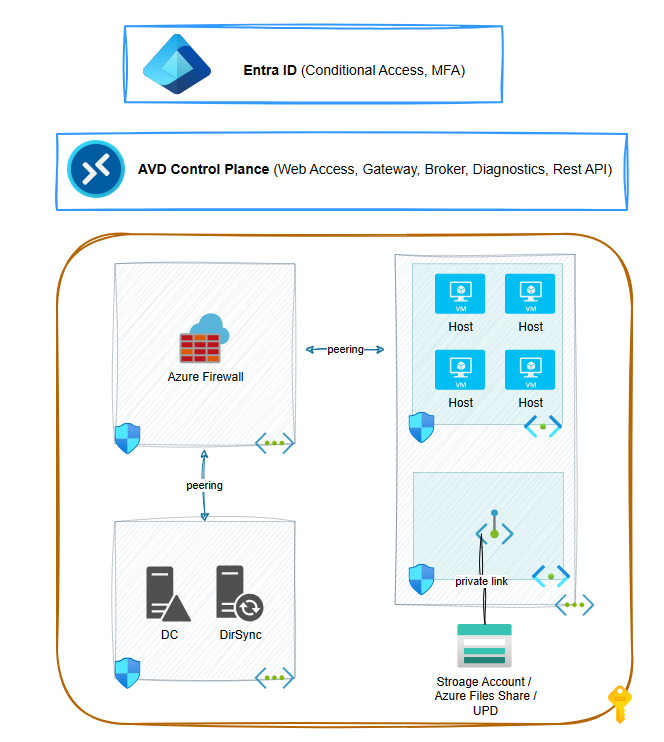
We will create an Azure Virtual Desktop environment for 50 remote users that will work in a Pooled session host architecture. What that means? Pooled session hosts means that we will deploy a pool of 7 session hosts (Virtual Machines) where users will be load balanced to any session host in the host pool.
The operating system will be Windows 11 multi-session with Office 365 preinstalled. We will select an Azure marketplace image; we will edit it to do any customizations we need and then we will create a custom image and use it for our AVD deployment.
To store the user profiles we need a persistent storage outside the hosts (virtual machines). We will store the images to an Azure File Share of a Storage Account and we will use the FXLogix tool to manage the profile containers.
High level diagram of the Lab Setup
LAB Guided Steps
Create three Resource Groups, one for Identity, one for Networking and one for the AVD, that will include the AVD Resource, the hosts and the private endpoints, and create the corresponding Virtual Networks. The AVD-Resources Virtual Network will have two subnets, one for the Hosts and one for the Private Endpoint. Finaly peer the identity & resources networks with the networking virtual network.
#create resource groups
az group create -n AVD-Identity-RG -l germanywestcentral
az group create -n AVD-Networking-RG -l germanywestcentral
az group create -n AVD-Resources-RG -l germanywestcentral

#create virtual networks
az network vnet create -n AVD-Identity-VNET -g AVD-Identity-RG --address-prefix 10.56.0.0/24 --subnet-name domain --subnet-prefixes 10.56.0.0/24
az network vnet create -n AVD-Networking-VNET -g AVD-Networking-RG --address-prefix 10.56.1.0/24 --subnet-name AzureFirewallSubnet --subnet-prefixes 10.56.1.0/26
az network vnet subnet create -g AVD-Networking-RG --vnet-name AVD-Networking-VNET -n AzureFirewallManagementSubnet --address-prefixes 10.56.1.64/26
az network vnet create -n AVD-Resources-VNET -g AVD-Resources-RG --address-prefix 10.56.2.0/24 --subnet-name hosts --subnet-prefixes 10.56.2.0/26
az network vnet subnet create -g AVD-Resources-RG --vnet-name AVD-Resources-VNET -n privatelink --address-prefixes 10.56.2.64/26

#create vnet peerings
# Get the id for vnet-1.
vNet1Id=$(az network vnet show -g AVD-Networking-RG --name AVD-Networking-VNET --query id --out tsv)
# Get the id for vnet-2.
vNet2Id=$(az network vnet show -g AVD-Identity-RG --name AVD-Identity-VNET --query id --out tsv)
# Get the id for vnet-3.
vNet3Id=$(az network vnet show -g AVD-Resources-RG --name AVD-Resources-VNET --query id --out tsv)
# peer vnet-1 to vnet-2
az network vnet peering create --name networking-to-identity -g AVD-Networking-RG --vnet-name AVD-Networking-VNET --remote-vnet $vNet2Id --allow-vnet-access
# peer vnet-1 to vnet-3
az network vnet peering create --name networking-to-resources -g AVD-Networking-RG --vnet-name AVD-Networking-VNET --remote-vnet $vNet3Id --allow-vnet-access
# peer vnet-2 to vnet-1
az network vnet peering create --name identity-to-networking -g AVD-Identity-RG --vnet-name AVD-Identity-VNET --remote-vnet $vNet1Id --allow-vnet-access --allow-forwarded-traffic
# peer vnet-3 to vnet-1
az network vnet peering create --name resources-to-networking -g AVD-Resources-RG --vnet-name AVD-Resources-VNET --remote-vnet $vNet1Id --allow-vnet-access --allow-forwarded-traffic

# Create an Azure Firewall Basic and add an allow network rule for the LAN
az network public-ip create --name "azfwpip" --resource-group "AVD-Networking-RG" --location "germanywestcentral" --sku "Standard"
az network public-ip create --name "azfwmpip" --resource-group "AVD-Networking-RG" --location "germanywestcentral" --sku "Standard"
az network firewall create -g AVD-Networking-RG -n AVDFirewall --sku AZFW_VNet --tier Basic --vnet-name AVD-Networking-VNET --conf-name avdIpConfig --m-conf-name avdmIpConfig --m-public-ip azfwmpip --public-ip azfwpip
az network firewall network-rule create --collection-name Net-Coll01 --destination-addresses 10.0.0.0/8 --destination-ports '*' --firewall-name AVDFirewall --name Allow-LAN --protocols Any --resource-group AVD-Networking-RG --priority 200 --source-addresses 10.0.0.0/8 --action Allow
az network firewall network-rule create --collection-name Net-Coll01 --destination-addresses '*' --destination-ports '*' --firewall-name AVDFirewall --name Allow-Internet --protocols Tcp --resource-group AVD-Networking-RG --source-addresses 10.0.0.0/8
az network firewall nat-rule create --collection-name Nat-Coll01 --priority 300 --dest-addr '4.185.80.0' --source-addresses '*' --destination-ports '3389' --firewall-name AVDFirewall --name rdptodc --protocols Any --resource-group AVD-Networking-RG --translated-address 10.56.0.4 --translated-port '3389' --action Dnat

# Create a Route Table (for the lab I created one route table to route all traffic to the Azure Firewall.) and associate it to the identity and resources subnets.
az network route-table create --name Firewall-rt-table --resource-group AVD-Networking-RG --location germanywestcentral --disable-bgp-route-propagation true
az network route-table route create --resource-group AVD-Networking-RG --name route-to-firewall --route-table-name Firewall-rt-table --address-prefix 0.0.0.0/0 --next-hop-type VirtualAppliance --next-hop-ip-address 10.56.1.4
RTiD=$(az network route-table show -g AVD-Networking-RG -n Firewall-rt-table --query id --out tsv)
az network vnet subnet update -n hosts -g AVD-Resources-RG --vnet-name AVD-Resources-VNET --route-table $RTiD
az network vnet subnet update -n privatelink -g AVD-Resources-RG --vnet-name AVD-Resources-VNET --route-table $RTiD
az network vnet subnet update -n domain -g AVD-Identity-RG --vnet-name AVD-Identity-VNET --route-table $RTiD

# create NSG (for the lab I will create just and allow lan rule)
az network nsg create -g AVD-Networking-RG -n AVD-NSG
az network nsg rule create -g AVD-Networking-RG --nsg-name AVD-NSG -n AllowLan --priority 100 --source-address-prefixes 10.0.0.0/8 --source-port-ranges '*' --destination-address-prefixes 10.0.0.0/8 --destination-port-ranges '*' --access Allow --protocol '*' --description "allowlan"
az network nsg rule create -g AVD-Networking-RG --nsg-name AVD-NSG -n AllowLanOut --priority 101 --source-address-prefixes 10.0.0.0/8 --source-port-ranges '*' --destination-address-prefixes 10.0.0.0/8 --destination-port-ranges '*' --access Allow --protocol '*' --description "allowlan" --direction Outbound
NSGId=$(az network nsg show -g AVD-Networking-RG --name AVD-NSG --query id --out tsv)
az network vnet subnet update -g AVD-Identity-RG -n domain --vnet-name AVD-Identity-VNET --network-security-group $NSGId
az network vnet subnet update -g AVD-Resources-RG -n hosts --vnet-name AVD-Resources-VNET --network-security-group $NSGId
az network vnet subnet update -g AVD-Resources-RG -n privatelink --vnet-name AVD-Resources-VNET --network-security-group $NSGId
Domain Controller
# Create a network interface with private ip address due to DNS requirements
az network nic create --resource-group AVD-Identity-RG --name "DCNic" --vnet-name "AVD-Identity-VNET" --subnet "domain" --private-ip-address "10.56.0.4"
# Create a virtual machine
az vm create --resource-group AVD-Identity-RG --name "DCVM" --image "win2022datacenter" --size "Standard_D2s_v3" --admin-username "azureuser" --admin-password "your-password" --nics "DCNic"
Login to the VM and promote to Domain Controller & DNS server. In case you have an on-premises Active Directory environment that you want to use, then you will need a hybrid connectivity (ExpressRoute or VPN) and instead of creating a new Domain, you will need to add this server as an additional domain controller. There are plenty of guides to create an Active Directory domain, like this Install Active Directory Domain Services (Level 100) | Microsoft Learn .
After the promotion, and once the DNS role is ready, change the DNS settings of all Virtual Networks to the private IP address of the ADDS/DNS server.
# Set DNS servers on VNets
az network vnet update --resource-group AVD-Identity-RG --name AVD-Identity-VNET --dns-servers "10.56.0.4"
az network vnet update --resource-group AVD-Networking-RG --name AVD-Networking-VNET --dns-servers "10.56.0.4"
az network vnet update --resource-group AVD-Resources-RG --name AVD-Resources-VNET --dns-servers "10.56.0.4"
User Profile Disks
Create one Storage Account with a Private Endpoint and a Private DNS Zone that is needed to access the Storage Account endpoint. In case of an Enterprise Scale deployment, the Private DNS Zones will be located in a centralized location. The Storage Account name needs to be globally unique.
# Create storage account
az storage account create --name avdupd916 -g AVD-Resources-RG -l germanywestcentral --sku 'Standard_LRS' --allow-blob-public-access false --public-network-access Disabled --https-only true

# Get the Storage Account ID
storageAccountId=$(az storage account show -n avdupd916 -g AVD-Resources-RG --query id --output tsv)

# Get the Subnet ID
subnetId=$(az network vnet subnet show -g AVD-Resources-RG -n privatelink --vnet-name AVD-Resources-VNET --query id --out tsv)

# Create the private endpoint
az network private-endpoint create --name avdupd916files --resource-group AVD-Resources-RG --vnet-name AVD-Resources-VNET --subnet $subnetId --private-connection-resource-id $storageAccountId --group-ids file --connection-name avdupd916filesconnection

# Create the private DNS zone
az network private-dns zone create --name 'privatelink.file.core.windows.net' -g AVD-Resources-RG

# Create the private DNS zone group
az network private-endpoint dns-zone-group create --name avddnszonegroup --endpoint-name avdupd916files --private-dns-zone 'privatelink.file.core.windows.net' -g AVD-Resources-RG --zone-name 'privatelink.file.core.windows.net'

#Create a VNET link to the identity VNET
IDVnetId=$(az network vnet show -g AVD-Identity-RG --name AVD-Identity-VNET --query id --out tsv)
az network private-dns link vnet create -g AVD-Resources-RG -n fileslinktoid -z privatelink.file.core.windows.net -v $IDVnetId -e False
Create the DirSync server
# Create a network interface
az network nic create --resource-group AVD-Identity-RG --name "DSNic" --vnet-name "AVD-Identity-VNET" --subnet "domain"
# Create a virtual machine
az vm create --resource-group AVD-Identity-RG --name "DSVM" --image "win2022datacenter" --size "Standard_D2s_v3" --admin-username "azureuser" --admin-password "your-password" --nics "DSNic"
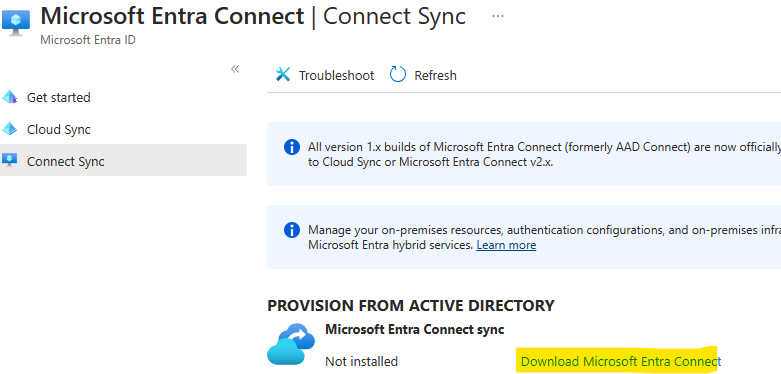
Sync the AD DS users using DirSync
Go to the Microsoft Entra Connect / Connect Sync / and download the Microsoft Entra Connect. Install it to the DirSync server and complete the express installation. After this process the AD DS users will be synced to the Entra ID.
Join the Storage Account to the Active Directory Domain Services
The Storage Account needs to be joined to the Active Directory Domain Servers in order to support domain user permissions and SSO. The process is described in this article: Enable AD DS authentication for Azure file shares | Microsoft Learn
- Login to the DirSync server
- install the latest .Net Framework Download .NET Framework | Free official downloads (microsoft.com)
- download the AzFilesHybrid module.
- Run Join-AzStorageAccount script, changing the required parameters.
Set-ExecutionPolicy -ExecutionPolicy Unrestricted -Scope CurrentUser
# Navigate to where AzFilesHybrid is unzipped and stored and run to copy the files into your path
C:\temp>.\CopyToPSPath.ps1
# Import AzFilesHybrid module
Import-Module -Name AzFilesHybrid
# Install the Az module and Connect to Azure
Install-Module Az
Connect-AzAccount
# Define parameters
$SubscriptionId = "********-****-****-****-********"
$ResourceGroupName = "AVD-Resources-RG"
$StorageAccountName = "avdupd916"
$SamAccountName = "avdupd916"
$DomainAccountType = "ComputerAccount"
$OuDistinguishedName = "OU=UPD,OU=AVDResources,DC=myavdd,DC=com"
# Select the target subscription for the current session
Select-AzSubscription -SubscriptionId $SubscriptionId
# Register the target storage account with your active directory environment under the target OU
Join-AzStorageAccount -ResourceGroupName $ResourceGroupName -StorageAccountName $StorageAccountName -SamAccountName $SamAccountName -DomainAccountType $DomainAccountType -OrganizationalUnitDistinguishedName $OuDistinguishedName
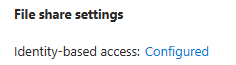
After this process, a computer object will appear at the specified OU and the Storage Account, at the File Share settings will have the identity-based access as Configured.

Create two Groups. One for the AVD Admins and one for the AVD Users. In my case is AVDAdmins and AVDUsers. Wait until the users and groups are synced to the Microsoft Entra ID.
Create the File Share for the User Profile Disks
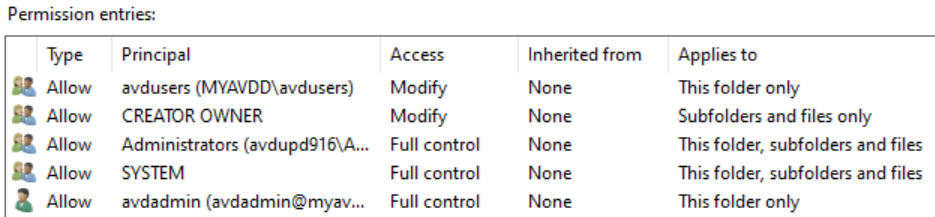
Create the File Share and Add the Admins Group to the “Storage File Data SMB Share Elevated Contributor” Role of the Storage Account and the Users Group to the “Storage File Data SMB Share Contributor” Role.
- “avdadmins” the “Storage File Data SMB Share Elevated Contributor” role
- “avdusers: the “Storage File Data SMB Share Contributor” role
# changing to PowerShell cause the Azure Cli caused me some problems. | Create the File Share
New-AzRmStorageShare -ResourceGroupName AVD-Resources-RG -StorageAccountName avdupd916 -Name updhare
# Back to Azure Cli | Provide access to the synced groups to the file share. To add a group you will need the object id of the group.
# avdadmins = ********************-0d5db5b092f8
az role assignment create --role "Storage File Data SMB Share Elevated Contributor" --assignee-object-id ********************-0d5db5b092f8 --assignee-principal-type Group --scope "/subscriptions/********************/resourceGroups/AVD-Resources-RG/providers/Microsoft.Storage/storageAccounts/avdupd916/fileServices/default/fileshares/updshare"
# avdusers = ********************-5e934d6f5c7d
az role assignment create --role "Storage File Data SMB Share Contributor" --assignee-object-id ********************-5e934d6f5c7d --assignee-principal-type Group --scope "/subscriptions/********************/resourceGroups/AVD-Resources-RG/providers/Microsoft.Storage/storageAccounts/avdupd916/fileServices/default/fileshares/updshare"
Assign NTFS permissions to the share
# mount the share to a member server to take a drive letter
net use Z: \\avdupd916.file.core.windows.net\updshare
icacls Z: /remove "Authenticated Users"
icacls Z: /remove "Builtin\Users"
icacls Z: /remove "Creator Owner"
icacls Z: /grant "avdusers:(M)"
icacls Z: /grant "Creator Owner:(OI)(CI)(IO)(M)"
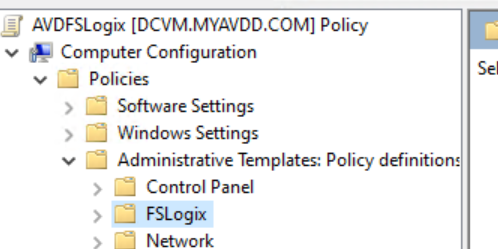
Configure the FSLogix through Group Policy
Download the FSLogix zip and copy the admx and adml files to the correct location based to your setup. Here for more info. Open the Group Policy Management. Create a new GPO and link it to the AVD Hosts OU. If the admx/adml files are copied correctly you should see the FSLogix settings under Computer Configuration / Policies / Administrative Templates
Settings to configure:
FSLogix / Profile Containers:
- Enabled = Enabled
- VHD Locations: \avdupd916.file.core.windows.net\updshare
- DeleteLocalProfileWhenVHDShouldApply = Enabled
- LockedRetryCount = 3
- LockedRetryInterval = 5
- ProfileType = Normal
FSLogix / Profile Containers / Container and Directory Naming
- VolumeType = VHDX
- SIDDirNameMatch = %username%.%userdomain%
- SIDDirNamePattern = %username%.%userdomain%
- VHDNameMatch = %username%
- VHDNamePattern = %username%
Create the Image
Create a VM from the marketplace. I chose a Windows 11 multi-sesison image with MS apps.
# Create a network interface
az network nic create --resource-group AVD-Resources-RG --name "ImageNic" --vnet-name "AVD-Resources-VNET" --subnet "hosts"
#find the image name
az vm image list --location germanywestcentral --publisher microsoftwindowsdesktop --offer office-365 --all --output table
# Create a virtual machine
az vm create --resource-group AVD-Resources-RG --name "ImageVM" --image "MicrosoftWindowsDesktop:office-365:win11-23h2-avd-m365:22631.3447.240409" --size "Standard_D2s_v3" --admin-username "vmadmin" --admin-password "*********" --nics "ImageNic"
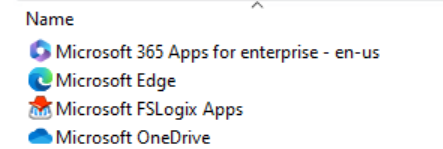
This image already has Microsoft 365, Teams, Edge, OneDrive in a multi-session installation and the FSLogix app to control the user profile disks. Install whatever application is needed and do any configuration, like language etc. I will install 7-zip & VLC Player just for the customization.
Take a snapshot of the VM disk before performing sysprep. You will need this snapshot when you need to do any updates and customizations to this image. After the sysprep you will no longer be able to spin an Azure VM. It is recommended to stop/deallocate the VM to take the snapshot. Open the Disk resource and press + Create Snapshot

Generalize the image with sysprep
C:\Windows\System32\Sysprep\sysprep.exe /oobe /generalize /shutdown
Capture the VM to create the Image. This is done by the Azure Portal, at the VM Overview blade, press Capture. Since the sysprep makes the OS unusable, select to delete the VM after creating the image. I like using the Azure compute gallery to store the images and versions, so I will select to add the image to a gallery.
- Share image to Azure compute gallery: Yes
- Automatically delete this virtual machine after creating the image: Yes
- Azure compute gallery: AVDACG
- Operating system state: Generalized
- Target VM image definition: win11-23H2
- Version number: 0.0.1
- Source virtual machine: imagevm

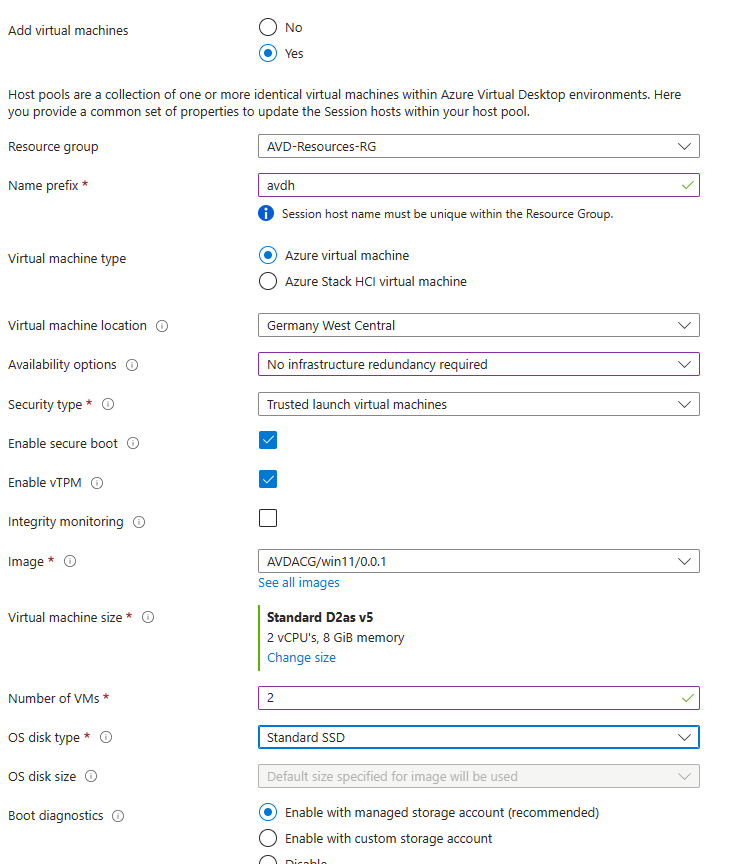
Create the Host Pool
At the Azure Portal, go to the Azure Virtual Desktop and Create a host pool
Basics: Select the subscription, the Resource Group, the Host Pool Name, location for the metadata, I will create an environment for Desktops, in a Pooled host pool type, so there will be no dedicated VMs per users.
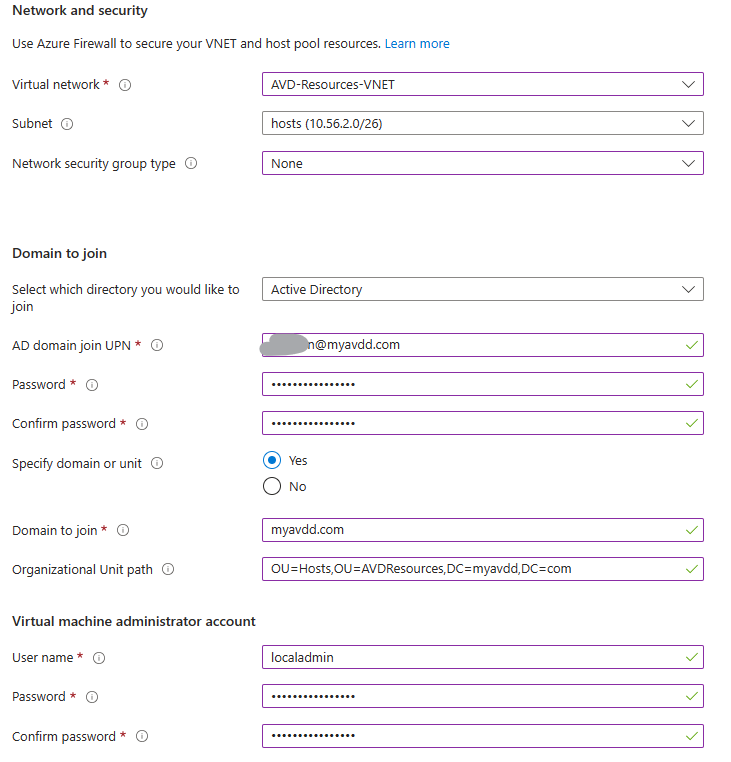
Virtual Machines: Select to add Virtual Machines. Give a prefix up to 12 characters, since AVD will add -## numbering. Select the image from the shared image gallery and how many VMs will be spined in total. At he networking select the network that is prepared for the hosts. For domain join add the UPN of the user (not domain\user, you need [email protected]), enter the domain name and the OU distinguished name. Finaly add details for the local admin user.
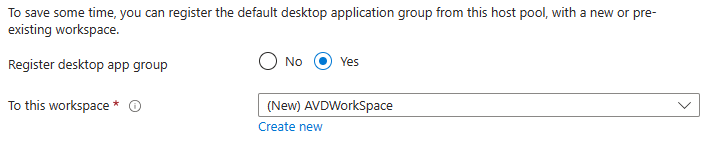
Workspace: Register the host pool to a workspace.
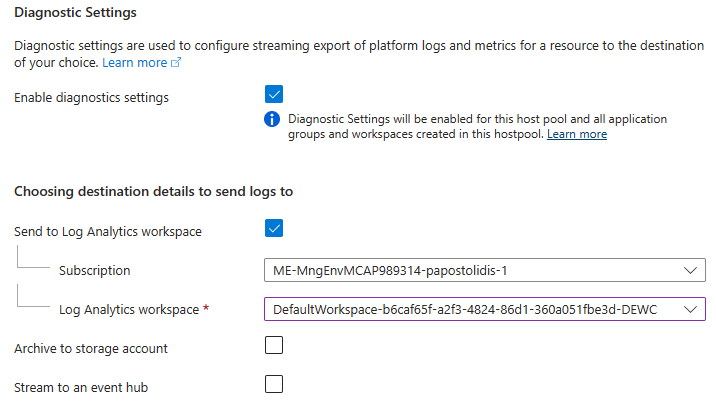
Advanced: Enable the diagnostic settings. You will need to have prepared a log analytics workspace.
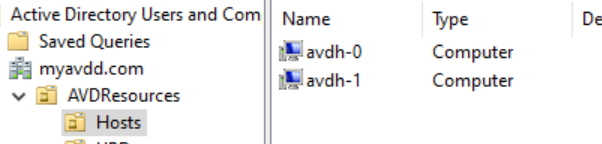
When the process is complete you will see two computer accounts at you active directory
and at the Azure Portal / Azure virtual Desktop / host pool will see the two hosts ready to connect
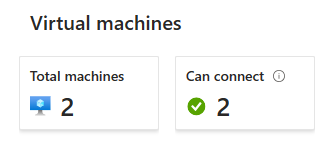
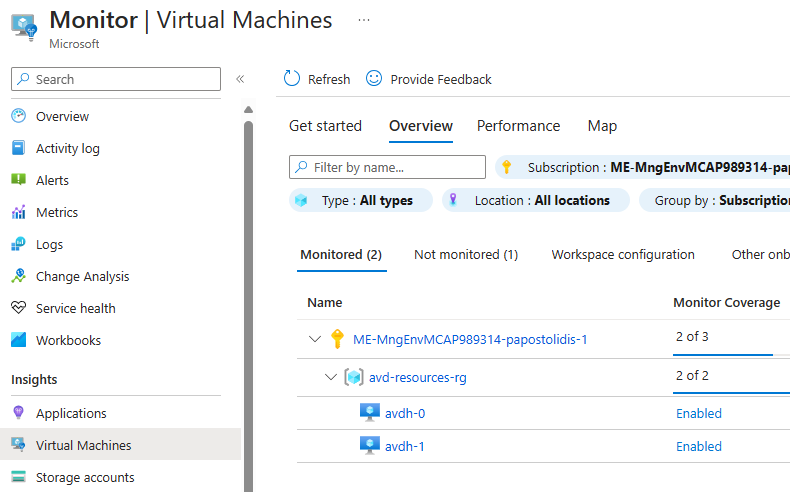
Go to Azure Monitor and enable the monitor for the host virtual machines.
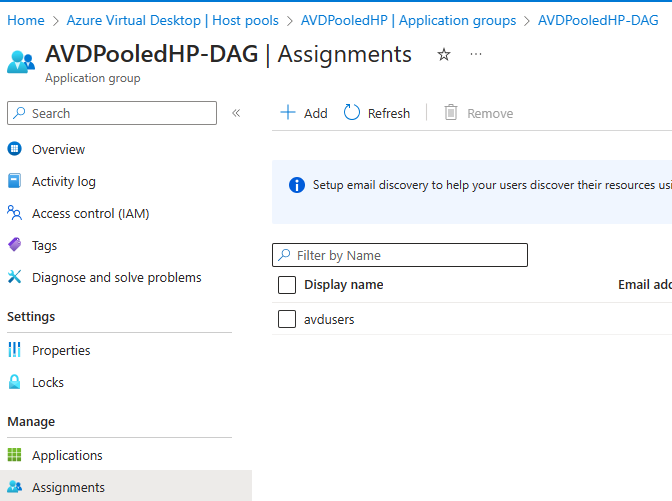
Assign users access to the Azure Virtual Desktop hosts
For the users to be able to see the session and connect, they need to be assigned access to the application group of the specific host pool. Go to the Azure Virtual Desktop / Host Pools / YourHostPool / Application Groups / YourApplicationPool Assignments and add the AVD Users group.
User access
AVD Web Access: https://aka.ms/avdweb
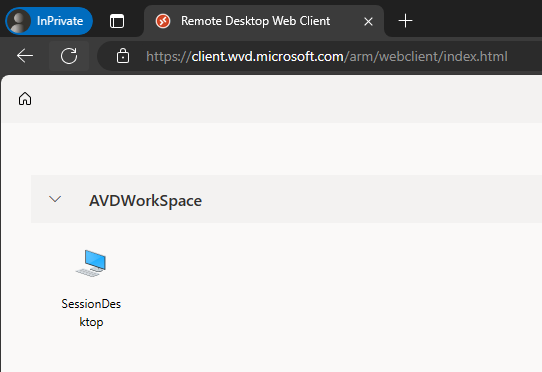
AVS Client for Windows, MacOS, iOS, Android, ChromeOS & Thin Clients: https://aka.ms/avdclient
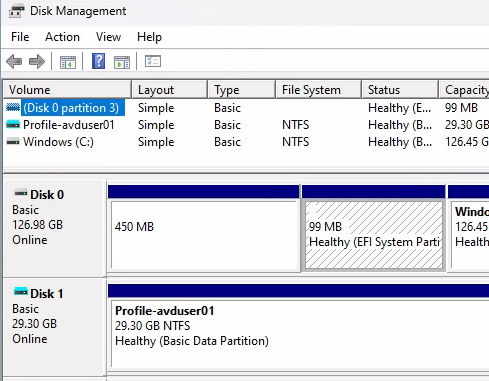
after the first login, the folder that stores the User Profile Disk will appear at the Azure File Share

Disk Management run as administrator, see the attached VHDX User Profile Disk.
Update Image
There are some options here. If we need to change the OS version, either from Windows 10 to 11, or from a version of 11 to another like 22H2 to 23H3, then create a new VM the marketplace with the target version, customize, capture and add it to the gallery as a new version. If you need to make changes to the existing image, create a VM from the image snapshot, customize and add it to the gallery as a new version.
In my lab I will create a VM from the snapshot just to see the process. Find the disk snapshot at the Azure Portal and press +Create Disk.
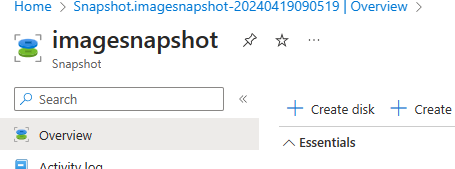
Open the disk and Create VM

Once the VM is ready do any customizations and run Sysprep, the same way we run it for the initial image, then Capture the VM and select to add it to the gallery as a new version. I selected the same gallery, the same VM image definition, since it is still win11, and I changed the version number.
- Share image to Azure compute gallery: Yes
- Automatically delete this virtual machine after creating the image: Yes
- Azure compute gallery: AVDACG
- Operating system state: Generalized
- Target VM image definition: win11-23H2
- Version number: 0.0.2
- Source virtual machine: imagevm
The process of updating the host pool
- Add new hosts to the host pool, selecting the latest image
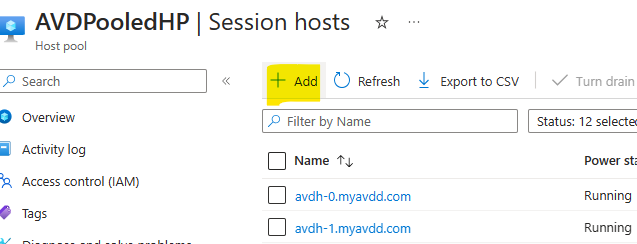

Once the new hosts are ready & Available at the host pool, select the old hosts and turn n drain mode, in order to stop accepting new sessions. After that point all new sessions will go to the new hosts. Once the old hosts are empty, remove them from the pool and delete the VMs.

After log off / log on:

Auto scale & Start VM on connect
There are two options to save a lot of money by using auto scale and start VM on connect. With auto scale, you can have one host running 24/7 and the rest stopped. Once the host reach the max session limit, the AVD will start the next host, until it reaches the maximum hosts created for this host pool. Combining the auto scale with the start VM on connect, even the first host can be stopped, and it will start when the first user will try to logon. With a Scaling Plan, you can have the hosts start and stop based to a schedule, like weekdays and working hours.
Some requirements
You must have a configured Max Session Limit parameter for that host pool & enable the Start VM On connect (if you need this feature too). Those options are at the Host Pool Properties.

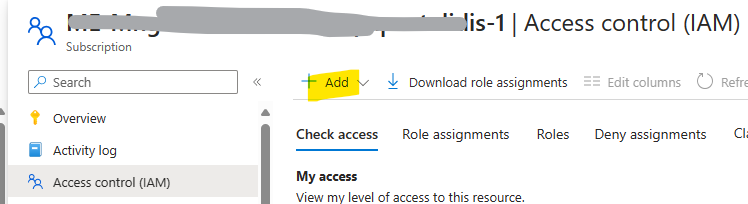
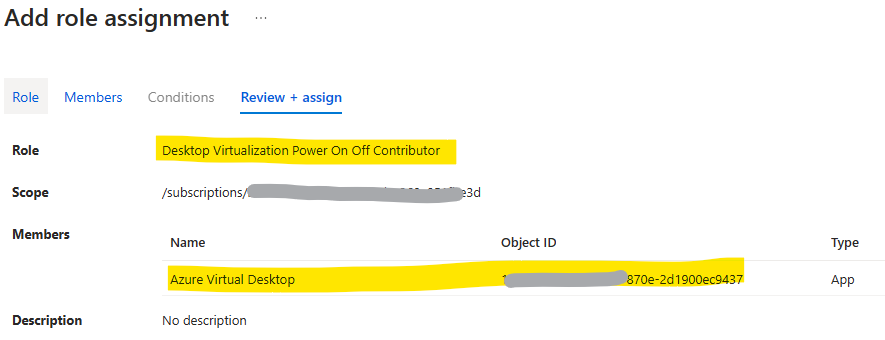
you must assign the Desktop Virtualization Power On Off Contributor RBAC role to the Azure Virtual Desktop service principal l with your Azure subscription as the assignable scope. Go to the Subscription / Access Control (AIM, Add role assignment, select Role: “Desktop Virtualization Power On Off Contributor”, select member the service principal “Azure Virtual Desktop” and assign.
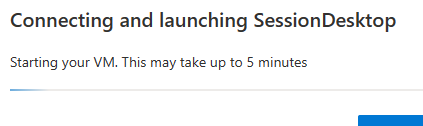
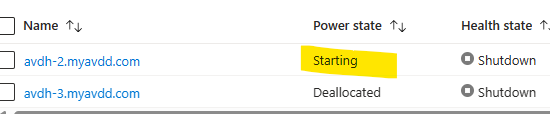
At this point, you can stop/deallocate the VMs from the Azure portal and then try to access the SessionDesktop with one user. The user will see a message stating that the VM is starting, and it may take up to 5 minutes and at the host pool you will see the first VM starting. For the LAB, I configured the max sessions to 1, so once I try to login with the second user, I will see the same message and it will start the second VM. If you need at least one VM to stay running, you can add a resource lock and make is read-only so the automation will not be able to deallocate it.
Scaling plan
Create a Scaling plan. Go to the Azure Virtual Desktop, under Manage select Scaling plans and Create a scaling plan. At the scaling plan you select a General configuration, like weekdays, select a presentence of the host to ramp-up a specific hour, to spin the VMs to be ready for your users in order to don’t wait 5 minutes for the VM to start on connect, select the peak hours, where most of your users are working, then select the Ramp-down, where a percentage of the hosts will stop. Here you can select if you will force log off the users or it will wait for the last user to log off. You can learn more here.
Once the scaling plan is created, select Next: Host pool assignments and assign the Schedule to one or more host pools.
Session Limits & Stop the VMs automation
One thing that is recommended is to configure the Session limits for the Remote Desktop Session Hosts. You can use the same GPO as the FSLogix settings, as it is computer configuration too. Open the GPO and go to Computer Configuration > Administrative Templates > Windows Components > Remote Desktop Services > Remote Desktop Session Host > Session Time Limits.
Set time limit for disconnected sessions: End a disconnected session = 30 minutes. Keep in mind that setting this after 30 minutes the disconnected session will be logged off.
If you want to trigger the Hosts to Stop/Deallocate once there are no active sessions, you can leverage Azure Automation account. There are plenty of guides like this: How to automate AVD VM shutdown based on usage and disconnected state? – Microsoft Q&A
The specific guide creates a runbook that runs a PowerShell script that queries the hosts for active sessions. If a host has no active sessions, then it stops the VM. First create a managed identity and assign the “Desktop Virtualization On Off Contributor” Azure role at the Hosts Resource Group. I altered it to check all the Session Hosts in a Host Pool:
#Please enable appropriate RBAC permissions to the system identity of this automation account. Otherwise, the runbook may fail

# Authenticate to Azure with user assigned managed identity
try
{
    "Logging in to Azure..."
    Connect-AzAccount -Identity
}
catch {
    Write-Error -Message $_.Exception
    throw $_.Exception
}

# Set the Azure subscription ID, resource group name, and VM name
$subscriptionId = "*************-360a051fbe3d"
$hostPoolName = "AVDPooledHP"
$resourceGroupName = "avd-resources-rg"
$myADDSDomain = ".myavdd.com"

$sessionhosts = Get-AzWvdSessionHost -ResourceGroupName $resourceGroupName -HostPoolName $hostPoolName
foreach ($sessionhost in $sessionhosts) {
$splitText = $sessionhost.name.Split("/")
$hostName = $splitText[1]
$vmName = $hostName.Replace($myADDSDomain, "")
# Get the connected user count
$connectedUserCount = Get-AzWvdSessionHost -ResourceGroupName $resourceGroupName -HostPoolName $hostPoolName -Name $hostName | Select-Object -ExpandProperty Session
# Check if the conditions are met and deallocate the VM
if ($connectedUserCount -eq 0 ) {Stop-AzVM -ResourceGroupName $resourceGroupName -Name $vmName -Force}
}
Authentication & security
Microsoft Entra ID provides some security features that can help secure the access to the Azure Virtual Desktop. One of those features is the Conditional Access Policies. Conditional Access Policies are essentially if-then statements used to enforce organizational security policies. They bring together various signals (like user or group membership, IP location, device information, etc.) to make access decisions. For example, if a user wants to access a resource, they might be required to complete an action like multifactor authentication.
Add a Policy to require MFA to access Azure Virtual Desktop
- From the Azure Portal go to Microsoft Entra ID / Security / Conditional Access / Create new policy
- Users: Select the group that includes the avd users. Mine is “avdusers” group.
- Target resources: Include / Select apps / Select / Azure Virtual Desktop
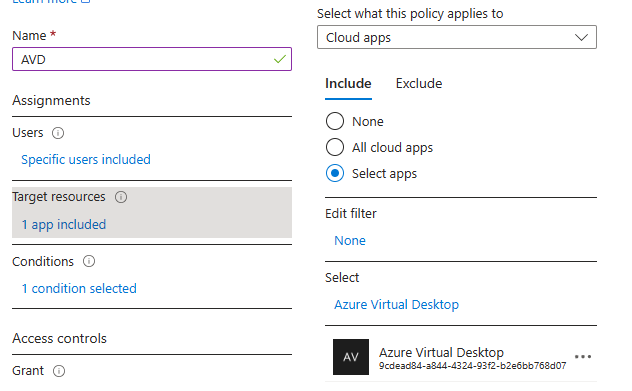
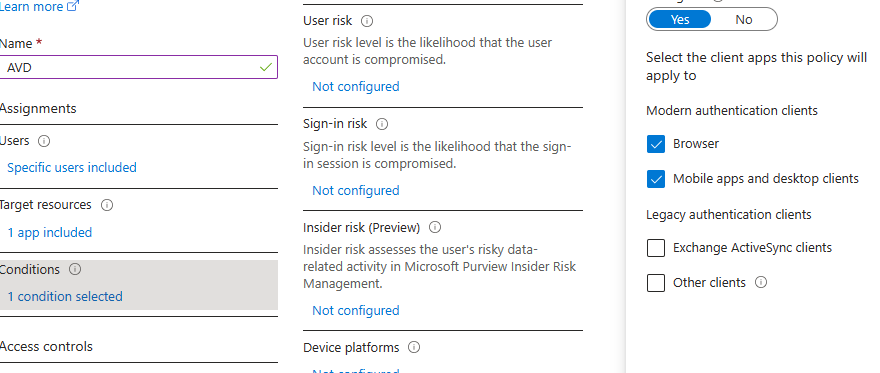
- 4. Conditions: Client Apps / select Browser and Mobile apps and desktop clients
5. Access Controls: Grand / Grand access / Require multi factor authentication
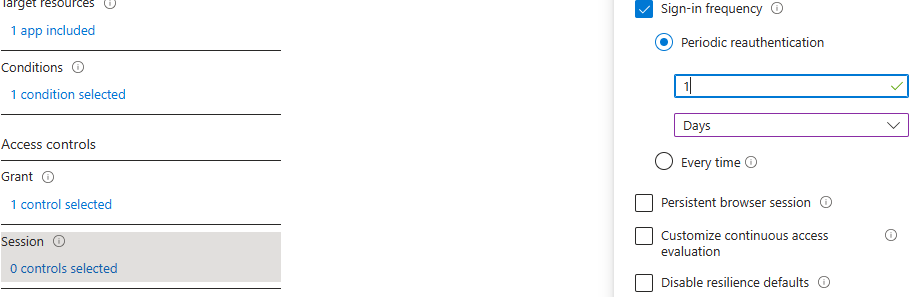
6. Session: It is not required but you can select the frequency that the user will be required to re-authenticate. You can select a periodic authentication and select some hours or some days or you can select every time.
Find out more here: Enforce Microsoft Entra multifactor authentication for Azure Virtual Desktop using Conditional Access – Azure | Microsoft Learn
User experience & Security
Many settings can be set directly from the Host Pool RDP Properties, like Device Redirection, Display Settings and Session behavior. Some other security settings, like Screen capture protection and Watermarking must be set by the GPO or Intune, by using the AVD Administrative Template. Once you install the templates the policy settings will be available under Azure Virtual Desktop administrative template is available, browse to Computer Configuration > Policies > Administrative Templates > Windows Components > Remote Desktop Services > Remote Desktop Session Host > Azure Virtual Desktop.
- Screen capture protection in Azure Virtual Desktop – Azure | Microsoft Learn
- Watermarking in Azure Virtual Desktop | Microsoft Learn
In addition, the Hosts can be hardened by using GPO or/and Intune.
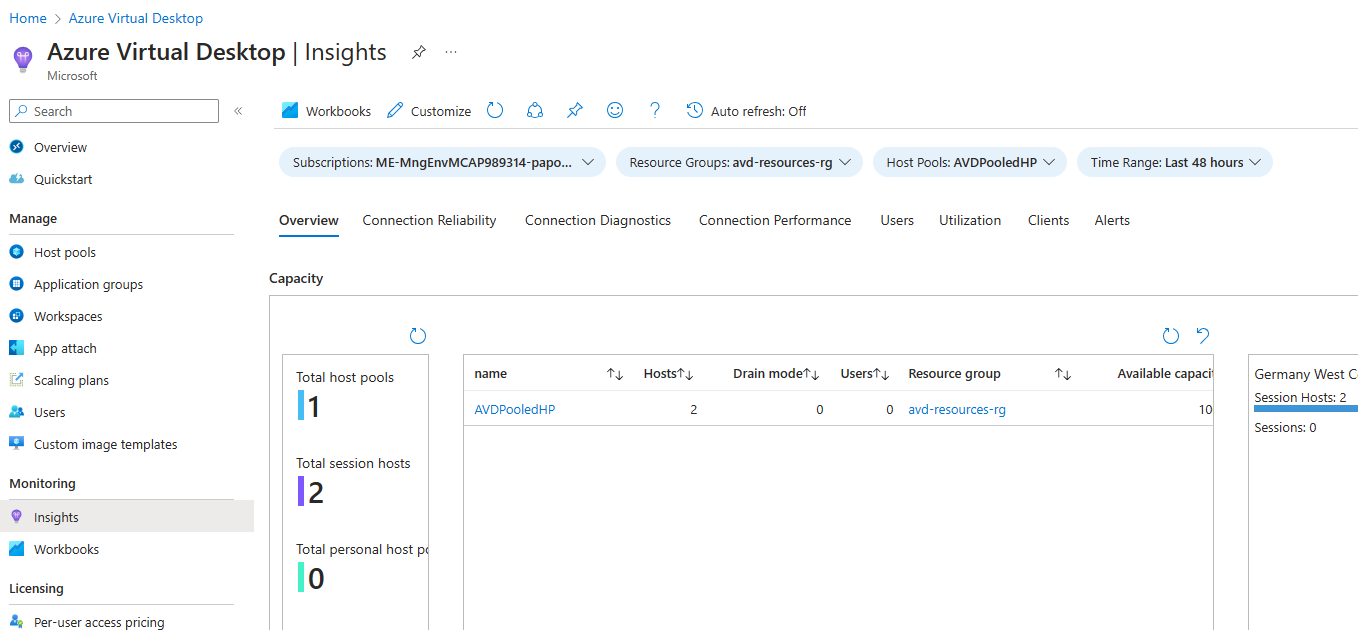
Monitoring
Azure Virtual Desktop Insights have plenty of information about Connection Reliability, Diagnostics, Performance, Users, Utilization, Clients and alerts out-of-the-box. You can customize the Insights dashboards and you can create a Workbook that fit your needs.

Pantelis Apostolidis is a Sr. Specialist, Azure at Microsoft and a former Microsoft Azure MVP. For the last 20 years, Pantelis has been involved to major cloud projects in Greece and abroad, helping companies to adopt and deploy cloud technologies, driving business value. He is entitled to a lot of Microsoft Expert Certifications, demonstrating his proven experience in delivering high quality solutions. He is an author, blogger and he is acting as a spokesperson for conferences, workshops and webinars. He is also an active member of several communities as a moderator in azureheads.gr and autoexec.gr. Follow him on Twitter @papostolidis.
