Azure Update Management
Have you checked the update management system for your Azure and On-Premises server that supports both Windows and Linux operating systems? And it is completely free! Please find the full list of supported operating systems and prerequisites here: https://docs.microsoft.com/en-us/azure/operations-management-suite/oms-solution-update-management#prerequisites.
Lets get started. The easiest way is to start from an Azure VM. Go to the VMs blade and find “Update management”. You will see a notification that the solution is not enabled.

Click the notification and the “Update Management” blade will open. The “Update Management” is an OMS solution, so you will need to create a “Log analytics” workspace, you can use the Free tier. If you don’t have a Log analytics workspace the wizard will create a default for you. Also it will create an automation account. Pressing enable will enable the “Update Management” solution.

After about 15 minutes, at the “Update Management” section of the VM you will see the report of the VM’s updates.

After that process the Automation Account is created and we can browse to the “Automation Accounts” service at the Azure Portal. There click the newly created Automation Account and scroll to the “Update Management” section. There we can see a full report of all VMs that we will add to the Update Management solution. To add more Azure VMs simply click the “Add Azure VM” button.

The Virtual Machines blade will open and will list all Virtual Machines at the tenant. Select each VM and press Enable.

After all required VMs are added to the Update Management solution click the “Schedule update deployment” button. There we will select the OS type of the deployment, the list of computers to update, what type of updates will deploy and the scheduler. More or less this is something familiar for anyone that has worked with WSUS.

Press the “Computers to Update” to select the Azure VMs for this deployment from the list of all VMs enabled.

Then select what types of updates will deploy.

If you want to exclude any specific update you can add the KB number at the “Excluded updated” blade.

And finally select the schedule that the update deployment will run.

Back to the “Update Management” blade, as we already said, we have a complete update monitoring of all Virtual Machines that are part of the “Update Management” solution.

You can also go to the “Log Analytics” workspase and open the “OMS Portal”

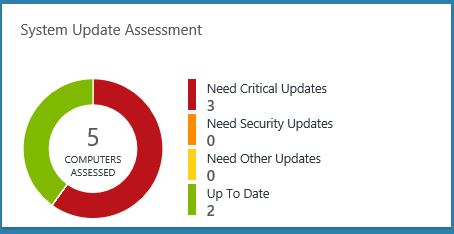
There, among other, you will see the newly added “System Update Assessment” solution.

and have a full monitoring and reporting of the updates of your whole environment.


Pantelis Apostolidis is a Sr. Specialist, Azure at Microsoft and a former Microsoft Azure MVP. For the last 20 years, Pantelis has been involved to major cloud projects in Greece and abroad, helping companies to adopt and deploy cloud technologies, driving business value. He is entitled to a lot of Microsoft Expert Certifications, demonstrating his proven experience in delivering high quality solutions. He is an author, blogger and he is acting as a spokesperson for conferences, workshops and webinars. He is also an active member of several communities as a moderator in azureheads.gr and autoexec.gr. Follow him on Twitter @papostolidis.

